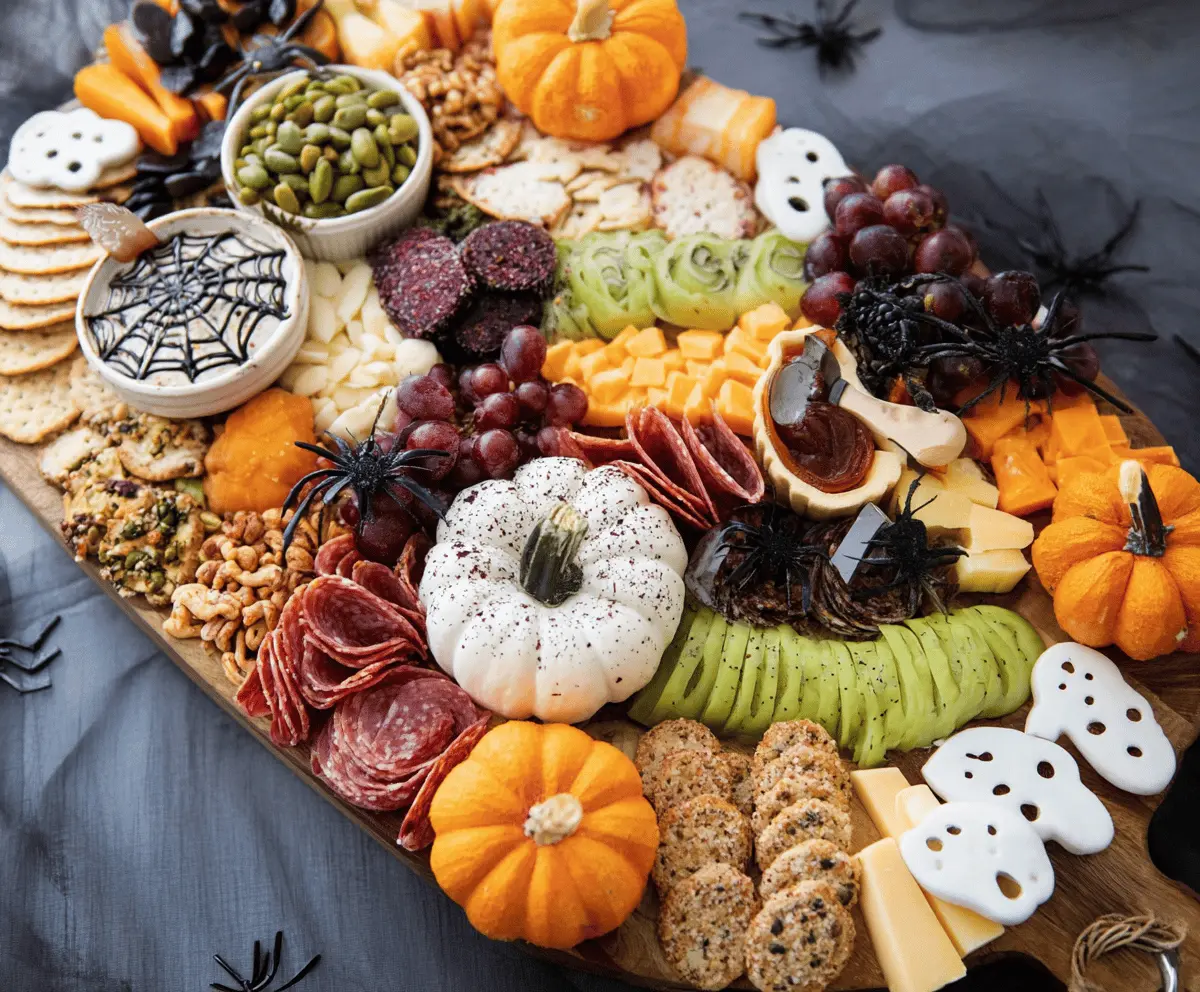
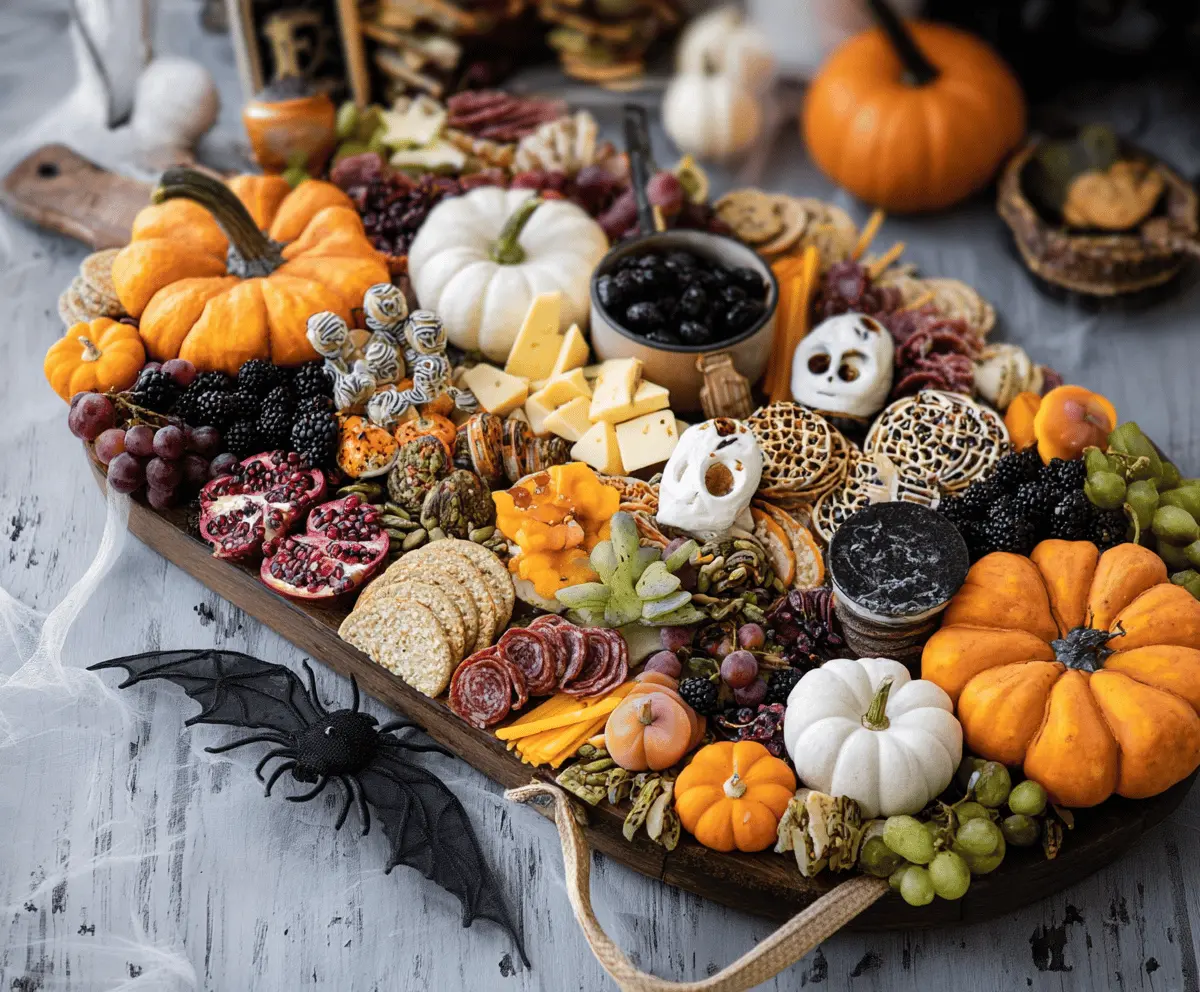
This Halloween Charcuterie Board is a fun way to celebrate the spooky season! It’s loaded with tasty treats like cheese, meats, and festive snacks that look great and taste even better.
Plus, you can get creative with creepy additions like gummy worms and ghost-shaped crackers! Making this board is a blast, and it’ll be a hit at your Halloween get-together. 🎃👻
Key Ingredients & Substitutions
Mini Pumpkins: These are perfect for decoration and add a fun touch. If you can’t find them, try using other seasonal decorations like gourds or even fall leaves for a different look.
Assorted Cheeses: I love using a mix of textures, like creamy and sharp cheeses. If you’re dairy-free, consider plant-based cheeses made from nuts or soy. Both styles offer great flavor!
Salami or Other Cured Meats: Salami is a classic choice, but prosciutto or turkey slices work well too, especially for those looking for lighter options. Always keep dietary restrictions in mind!
Crackers: I like using a variety of crackers. If gluten-free is a must, there are many delicious gluten-free options available today. Rice cakes also make for a light crunch!
Fresh Fruits: Grapes and blackberries are crowd-pleasers, but feel free to swap in strawberries or apple slices, especially if you want to add a splash of color!
How Do I Create an Eye-Catching Arrangement?
Arranging your charcuterie board can be just as fun as eating from it! Here’s how to do it well:
- Start with the larger items. Place your mini pumpkins first to establish focal points.
- Next, add clusters of cheeses around the pumpkins. This creates balance and visual appeal.
- Arrange the meats by fanning them out. It not only looks yummy but makes grabbing easier!
- Stack or layer crackers alongside the meats and cheeses. Varying the heights adds dimension.
- Fill any gaps with fruits, nuts, and candies. Keeping colors in mind will enhance the festive feel.
- Finally, use small bowls for olives and pickles; they not only save space but offer ease for your guests.
Remember, it’s all about having fun and making it look festive for Halloween! Add props like fake spiders or cobwebs for an even spookier touch.
How to Make a Halloween Charcuterie Board
Ingredients You’ll Need:
For Decoration:
- Mini pumpkins (orange and white varieties), about 6-8 total
For the Cheeses:
- Assorted cheeses (cheddar slices, gouda wedges, Swiss cubes), approx. 2 cups total
For the Meats:
- Salami or other cured meats, thinly sliced, 1 cup
For the Snacks:
- Crackers (round and themed Halloween shapes like ghosts or pumpkins), about 2 cups
- Black olives, 1 cup
- Fresh grapes (green and red), 1 cup each
- Blackberries, 1 cup
- Pomegranate halves or seeds, from 1 large pomegranate
- Mixed nuts and seeds (pumpkin seeds, pistachios), 1/2 cup
- Decorative Halloween-themed candies or chocolates (e.g., skull-shaped chocolates), 1/2 cup
- Dried fruit (e.g., figs or apricots), 1/2 cup
- Assorted pickles or olives, 1/2 cup
- Cheese straws or pretzels, 1 cup
For Extra Color:
- Small decorative edible succulents (optional), or more sliced cucumber and bell peppers
How Much Time Will You Need?
This festive Halloween Charcuterie Board takes about 30 minutes to prepare. It’s quick, easy, and perfect for impressing your guests at any Halloween gathering!
Step-by-Step Instructions:
1. Prepare Your Board:
First, choose a large wooden or slate board as your canvas. This will be the base where all the delicious goodies will be arranged.
2. Add the Mini Pumpkins:
Place the mini pumpkins around the board. Use them as focal points to bring in that festive Halloween spirit!
3. Arrange the Cheeses:
Cluster the assorted cheeses around the pumpkins. Include different shapes and textures, like sliced, cubed, and wedge forms, for added interest.
4. Place the Meats:
Fan out the salami or sliced cured meats on one or two sides of the board. This will create a beautiful and easy-to-access meat selection!
5. Add the Crackers:
Stack the crackers in small piles or let them overlap. Position them next to the cheeses and meats for an easy pairing option.
6. Include Olives and Pickles:
Fill small bowls with black olives or assorted pickles. Place the bowls within the arrangement for easy serving and a burst of flavor.
7. Distribute Fresh Fruits:
Scatter fresh grapes and blackberries in small bunches around the board. They not only add color but also bring a refreshing taste!
8. Add Pomegranate for Color:
Either place pomegranate halves around or sprinkle pomegranate seeds across sections for some extra vibrancy and texture.
9. Scatter Nuts and Seeds:
Lightly scatter mixed nuts and seeds around the board for a crunchy texture that contrasts nicely with the other elements.
10. Decorate with Themed Candies:
Finish off with cute Halloween-themed candies or chocolates. These little additions make it fun and exciting for kids and adults alike!
11. Fill in Any Gaps:
Use dried fruit, cheese straws, pretzels, or even edible succulents to fill in any gaps on the board, making it visually appealing.
12. Optional Halloween Props:
Add some small Halloween decorative items like artificial spiders or cobwebs around the board for an extra spooky vibe!
13. Serve It Up:
Once you’re done arranging, serve your Charcuterie Board at room temperature for the best taste and texture. Enjoy the compliments!
This Halloween Charcuterie Board is not just a treat for the taste buds but also a visual feast that brings festive joy to any gathering. Grab your friends and dive in—happy Halloween!
Can I Use Different Types of Cheese?
Absolutely! Feel free to mix and match your favorite cheeses. Soft cheeses like brie or blue cheese can add unique flavors, while non-dairy cheeses can suit those with dietary restrictions.
Can I Prep the Board in Advance?
Yes, you can prepare the board ahead of time! Assemble all the ingredients except for perishable items like grapes and blackberries. Cover it with plastic wrap and refrigerate until you’re ready to serve. Just add the fresh items right before serving for the best taste and appearance.
How Should I Store Leftovers?
Store any leftovers in an airtight container in the fridge for up to 2-3 days. Keep items like crackers separate from moist foods to maintain their crunch. Enjoy your snacks as they are, or add them to salads or wraps!
What If I Can’t Find Mini Pumpkins?
No worries! You can substitute mini pumpkins with decorative gourds or even fall leaves to maintain the festive spirit. The goal is to create a visually appealing centerpiece, so get creative with your decorations!