Tender biscuit topping and bubbling pink rhubarb are a hard combination to beat, especially when the fruit turns jammy underneath and the top bakes up with craggy, golden edges. This old fashioned rhubarb cobbler keeps the filling bright and tangy instead of syrupy-sweet, so every spoonful has that sharp rhubarb bite under a soft, buttery cap.
The trick is giving the filling enough sugar and cornstarch to thicken as it bakes without turning heavy. Rhubarb releases a lot of juice, and if you skip the cornstarch or rush the cooling time, you end up with a runny pan instead of clean spoonfuls. The biscuit topping is mixed just until the flour disappears, which keeps it tender instead of tough.
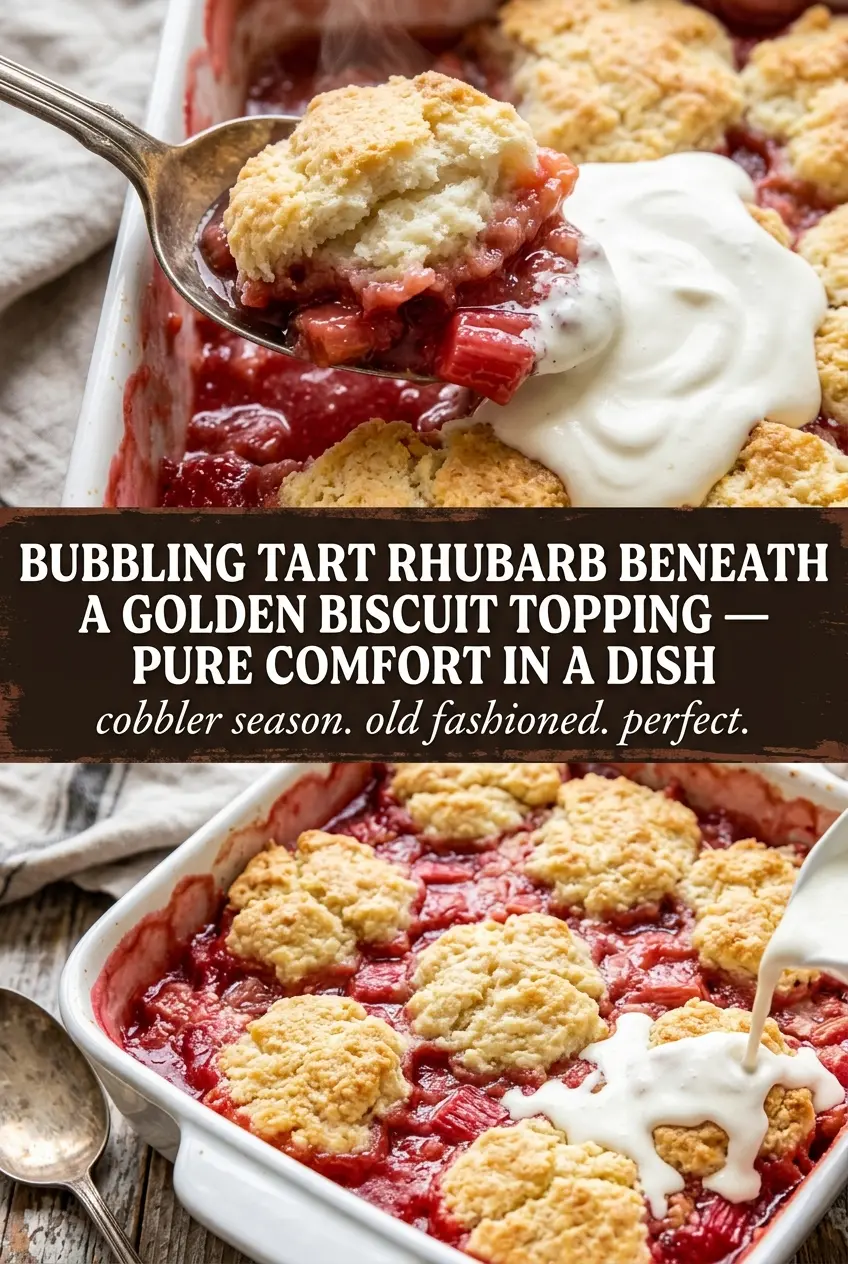
Below, I’ve included the little details that matter most: how to keep the topping light, what the filling should look like when it’s done, and a few swaps that make this work even when you’re missing an ingredient or two.
The rhubarb baked down into a perfect thick filling, and the biscuit top stayed light instead of soggy. I let it rest the full 15 minutes and it scooped beautifully.
Save this old fashioned rhubarb cobbler for the day you want a bubbling fruit dessert with a tender biscuit topping and a spoonful of vanilla ice cream.
The Part That Keeps Rhubarb Cobbler From Turning Watery
Rhubarb is generous with juice. That’s what makes cobbler so good, but it also means the filling can go from glossy to soupy if there isn’t enough starch in the pan. Cornstarch needs heat and time to work, which is why this cobbler doesn’t come together the instant it leaves the oven. The bubbling in the center is the signal you want; that’s when the starch has thickened the juices instead of just suspending them.
The other mistake people make is cutting into it too soon. Rhubarb filling needs that 15-minute rest to settle, or the first scoop runs across the plate before it has a chance to hold together. The top will still be warm, the fruit will still be soft, and the filling will finally have enough body to spoon cleanly.
- Fresh rhubarb — Use stalks that are firm and crisp. Older rhubarb can get stringy, and that texture never bakes out.
- Cornstarch — This is what turns the released juices into a proper cobbler filling. Flour works in a pinch, but it leaves the filling a little cloudier and less clean-tasting.
- Sugar — Rhubarb is sharply tart, so the sugar here isn’t just sweetness; it balances the fruit and helps draw out juice for the cornstarch to thicken.
- Cold butter — Cold butter in the topping gives you small pockets of fat that melt in the oven and create a tender, biscuit-like crumb instead of a dense lid.
What Each Ingredient Is Actually Doing in This Rhubarb Cobbler

- Rhubarb prepared to remove excess moisture — Drain the rhubarb well before using it. Pat it dry if needed so you’re not adding free liquid to the filling.
- Sugar for the filling — This draws moisture from the rhubarb and creates a syrup that thickens as it cooks. Use enough sugar to balance both the tartness and the liquid.
- Cornstarch or tapioca (optional but helpful) — A small amount helps thicken the filling without making it starchy or gluey. This prevents pooling at the bottom of the cobbler.
- Lemon juice — This brightens the rhubarb and helps balance the filling. It also helps the thickener work better by adding acid.
- Cinnamon or vanilla (optional) — These add depth and prevent the filling from tasting one-dimensionally tart. They also complement the biscuit topping.
- Biscuit dough (not heavy or wet) — The topping should be relatively dry and thick. A wet biscuit dough will get soggy from the filling’s steam.
- Baking time (until biscuits are golden and filling bubbles at edges) — Don’t underbake or the filling won’t thicken. Don’t overbake or the biscuits will dry out.
- Resting time before serving — Let the cobbler rest for 10 minutes after baking. This lets the filling set slightly so it doesn’t run all over the plate.
Building the Biscuit Top So It Bakes Up Tender, Not Doughy
When the topping is mixed correctly, it bakes into soft, golden dumplings with crisp edges where the sugar hits the heat. The flour mixture should look crumbly after you cut in the butter, with pieces about the size of peas. Once the milk goes in, stop stirring as soon as the dry streaks disappear. The dough is supposed to look wet and shaggy; if you keep mixing until it seems neat, the topping gets tough.
Starting the Filling
Butter the baking dish first so the edges release cleanly after the cobbler cools. Mix the rhubarb, sugar, cornstarch, and water directly in the dish so every piece gets coated before the fruit starts giving off juice. Spread it into an even layer; if the fruit piles up too high in one spot, the center bakes slower and the topping browns unevenly.
Making the Biscuit Dough
Whisk the dry ingredients first, then cut in the cold butter until the mixture looks sandy with some larger butter pieces still visible. Stir in the milk just until combined. If the dough seems wetter than expected, that’s right; a loose dough drops more easily over the fruit and bakes up tender. Dry, overworked dough is the fastest way to end up with a bready topping.
Baking Until the Filling Is Bubbling
Drop spoonfuls of dough over the fruit and leave a few gaps so steam can escape and the filling can bubble through. Sprinkle the top with sugar for a light crunch. Bake until the topping is deeply golden and the filling is actively bubbling around the edges and in the center, not just steaming. If the top browns early, the filling probably needs more time, so keep baking until you see those thick, slow bubbles.
How to Adapt This Old Fashioned Rhubarb Cobbler
Add Strawberries for a Sweeter, Rounder Filling
Replace 1 to 2 cups of the rhubarb with chopped strawberries. The berries soften quickly and bring extra sweetness, which takes the edge off the tartness and gives the filling a deeper pink color. Keep the cornstarch the same, since strawberries still release plenty of juice.
Make It Dairy-Free Without Losing the Biscuit Texture
Use a firm dairy-free butter substitute in place of the butter and unsweetened oat milk or almond milk instead of regular milk. The topping won’t brown quite as deeply, but it will still bake up tender if the fat stays cold before it goes into the dough.
Use Frozen Rhubarb When Fresh Isn’t Available
Frozen rhubarb works, but don’t thaw it first. Add it straight from frozen so it doesn’t dump extra liquid into the dish before baking. You may need a few extra minutes in the oven, and the filling should still end with steady bubbling before you pull it out.
Cut the Sugar for a Sharper, More Tart Cobbler
Reduce the filling sugar by 1/4 cup if you like rhubarb to stay punchy and tart. The filling will taste brighter, but it won’t be quite as soft and jammy, so serve it warm with vanilla ice cream to balance the edge.
Storage and Reheating
- Refrigerator: Store covered for up to 4 days. The topping softens as it sits, but the flavor stays good.
- Freezer: Freeze baked and cooled cobbler in an airtight container for up to 2 months. Thaw overnight in the refrigerator before reheating.
- Reheating: Warm in a 325°F oven until heated through. The microwave makes the topping rubbery and pushes the filling into a puddle, so the oven is the better choice if you want the biscuit top to stay pleasant.
Questions I Get Asked About This Recipe
Old Fashioned Rhubarb Cobbler
Ingredients
Equipment
Method
- Preheat oven to 375°F and butter a 2-quart baking dish.
- Combine rhubarb, sugar, cornstarch, and water in the baking dish and mix well.
- Whisk together flour, sugar, baking powder, and salt until evenly combined.
- Cut in cold butter until the mixture looks crumbly.
- Stir in milk until just combined (dough will be wet).
- Drop spoonfuls of dough over the rhubarb filling, leaving space between each scoop.
- Sprinkle topping with sugar for a lightly crisp, golden finish.
- Bake for 40-45 minutes until the topping is golden and the filling is bubbling.
- Cool for 15 minutes before serving warm, letting the filling thicken slightly as it sets.