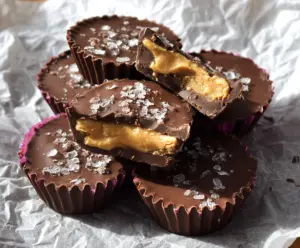
Chocolate Peanut Butter Cups are a tasty treat that combines smooth peanut butter with rich chocolate. They’re sure to satisfy your sweet cravings!
These little bites are like a hug for your taste buds. I find it hard to have just one—they disappear fast in my house! 😄
Making these at home is super easy. Just layer melted chocolate and peanut butter. You won’t believe how quickly they come together and how good they taste!
Key Ingredients & Substitutions
Creamy Peanut Butter: This is the star ingredient! I love creamy peanut butter for its smooth texture. If you’re looking for a healthier option, natural peanut butter works great too. Just make sure it’s well-stirred!
Powdered Sugar: This sweetens the filling nicely. If you’re avoiding powdered sugar, you can use maple syrup or honey, but it will change the texture a bit. Just adjust the amount of peanut butter to keep it thick enough.
Unsalted Butter: It adds richness to the peanut butter layer. If you’re dairy-free, coconut oil or a plant-based butter will work fine, but the taste will change slightly.
Semi-Sweet Chocolate Chips: I prefer semi-sweet chocolate for balance, but dark chocolate can also be used for a bolder flavor. If you’re avoiding sugar, look for sugar-free chocolate chips!
Coconut Oil: This is optional but helps the chocolate stay smooth and glossy. If you don’t have it, you can skip it, but the chocolate may not be as shiny.
Flaky Sea Salt: A sprinkle on top elevates the taste. If you don’t have flaky sea salt, any salt will do, but use it sparingly to avoid overpowering the sweetness!
How Do You Melt Chocolate Without Burning It?
Melting chocolate can be tricky if you’re not careful. Here’s my simple method:
- Use a microwave-safe bowl and add your chocolate chips and coconut oil.
- Heat the chocolate in 30-second bursts, stirring after each interval until it’s fully melted. This prevents burning.
- Be mindful of the last few seconds, as the residual heat can help melt any remaining chunks.
With these steps, you’ll have deliciously smooth chocolate to coat your cups perfectly! Happy melting!

How to Make Delicious Chocolate Peanut Butter Cups
Ingredients You’ll Need:
For the Peanut Butter Filling:
- 1 cup creamy peanut butter (unsweetened or lightly salted)
- 1/4 cup powdered sugar
- 1/4 cup unsalted butter, softened
For the Chocolate Coating:
- 2 cups semi-sweet chocolate chips (or chocolate melting wafers)
- 1 tablespoon coconut oil (optional, for smoother chocolate)
For the Topping:
- Flaky sea salt (for sprinkling on top)
How Much Time Will You Need?
This recipe takes about 15 minutes of prep time, plus an additional 40 minutes to chill in the freezer. You’ll spend a few minutes mixing and melting, and then just let them set in the freezer. It’s super simple and so worth it!
Step-by-Step Instructions:
1. Prepare the Muffin Tin:
Line a standard muffin tin with 12 paper cupcake liners. This will help make it easy to remove your cups once they’re set!
2. Make the Peanut Butter Filling:
In a medium bowl, combine the creamy peanut butter, powdered sugar, and softened butter. Use a spatula or spoon to mix everything together until it’s smooth and creamy. Set this delicious mixture aside for now.
3. Melt the Chocolate:
In a microwave-safe bowl, combine the chocolate chips and coconut oil (if you’re using it). Microwave the mixture in 30-second increments, stirring well after each time until the chocolate is completely melted and smooth. Be careful not to burn it!
4. Add the First Chocolate Layer:
Spoon about 1 tablespoon of the melted chocolate into the bottom of each cupcake liner. Use the back of your spoon to evenly spread the chocolate across the bottom. Once done, pop the muffin tin into the freezer for around 10 minutes, so the chocolate sets firm.
5. Layer the Peanut Butter Filling:
Once the chocolate base is set, take the muffin tin out of the freezer. Add about 1 tablespoon of your peanut butter mixture on top of the chocolate layer in each cup, gently flattening it out with the back of the spoon.
6. Cover with More Chocolate:
Pour another tablespoon of the melted chocolate over the peanut butter layer in each cup, ensuring it’s fully covered. This will create the top layer of your delicious cups!
7. Add the Finishing Touch:
Sprinkle a touch of flaky sea salt on top of each cup. This little addition enhances the flavor and gives a delightful contrast to the sweetness!
8. Chill to Set:
Return the muffin tin to the freezer and let the cups chill for at least 30 minutes, or until they’re completely firm to the touch. No need to rush; patience will pay off!
9. Enjoy Your Treats:
Once they’re set, carefully remove the peanut butter cups from the liners, and store them in an airtight container in the refrigerator until you’re ready to enjoy them. These treats are perfect for sharing (or keeping all to yourself)!
Enjoy your homemade Chocolate Peanut Butter Cups! They are sure to be a hit!
Can I Use Natural Peanut Butter Instead?
Absolutely! Natural peanut butter will work well, but you may need to stir it vigorously before mixing to ensure it’s creamy. Just keep in mind that it may be slightly less sweet, so adjust the sugar to taste if desired.
How Do I Store Leftovers?
Store any leftover peanut butter cups in an airtight container in the refrigerator for up to a week. They can also be frozen for longer storage—just make sure to separate layers with parchment paper so they don’t stick together!
What Can I Substitute for the Powdered Sugar?
If you’re looking for a healthier alternative, try using maple syrup or honey! Just remember to reduce the amount of peanut butter slightly to maintain the right consistency.
Can I Make This Recipe Dairy-Free?
Yes, you can! Substitute the unsalted butter with a dairy-free alternative, like coconut oil or a vegan butter. Make sure to use dairy-free chocolate chips too for a completely dairy-free treat!