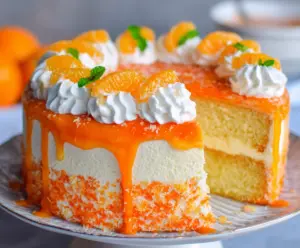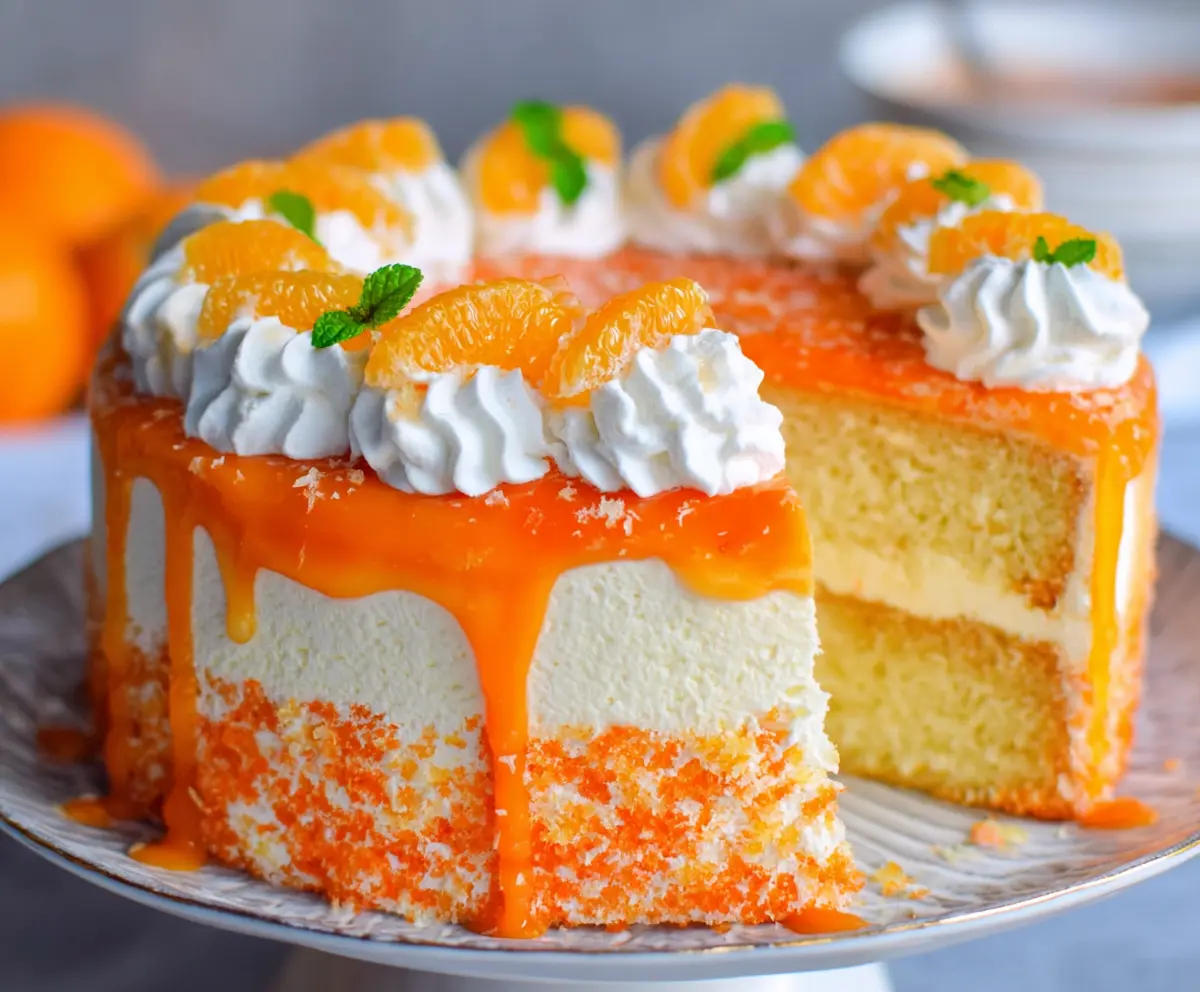
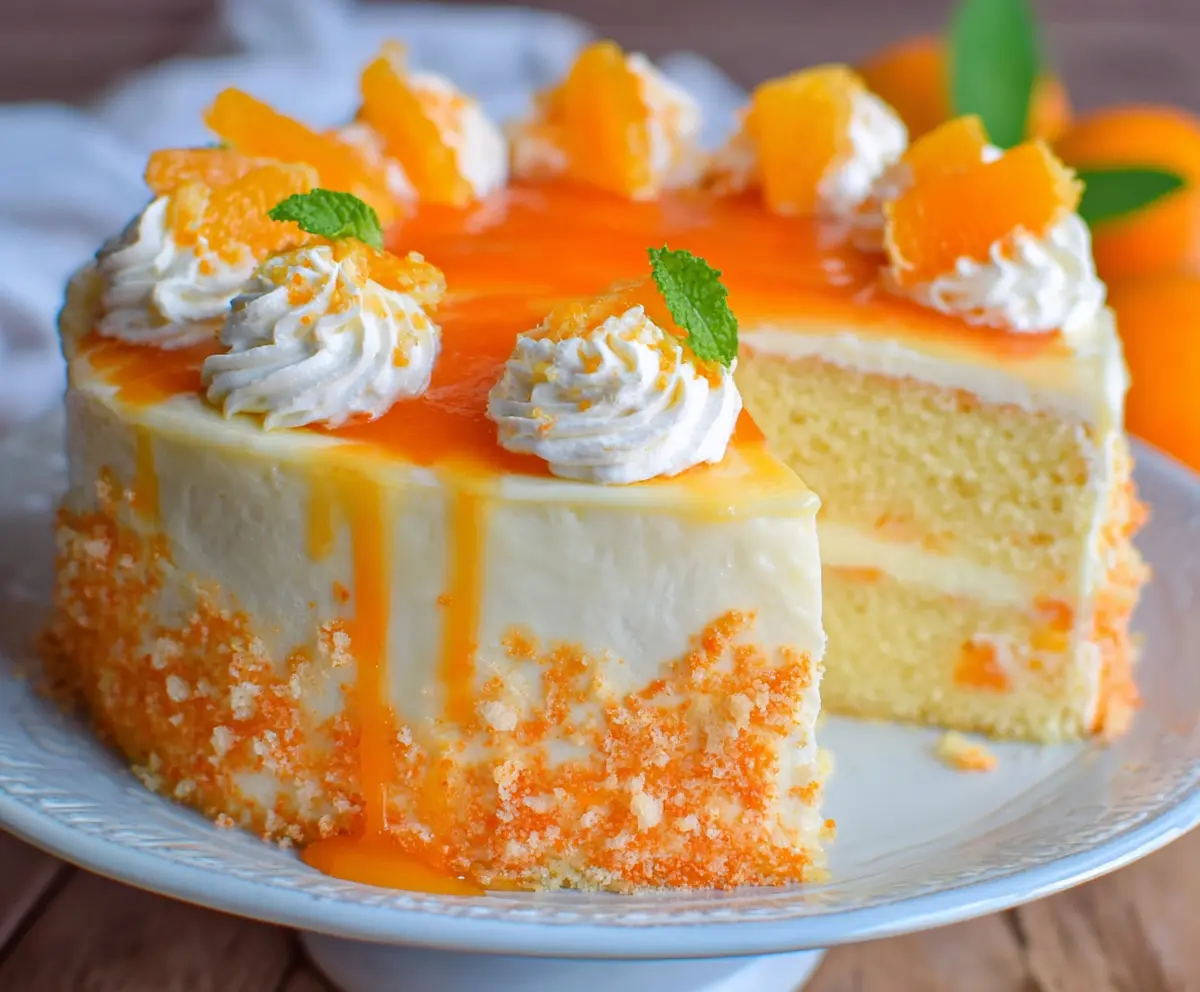
This Orange Creamsicle Cake is like a sunny day on a plate! With its fluffy orange flavor and creamy frosting, it’s a sweet treat that brings joy to any party or family gathering.
Every bite reminds me of those tasty creamsicles from childhood. I love serving it chilled—like a refreshing hug on a hot day. Your friends will be asking for seconds!
Key Ingredients & Substitutions
Flour: All-purpose flour is perfect for this cake, giving a nice structure. You can use cake flour if you want a lighter texture, though it might make the cake a tad delicate.
Unsalted Butter: This is best for controlling salt levels. If you’re in a pinch, you can use margarine or a dairy-free alternative, but the flavor may be different.
Granulated Sugar: You could swap half the sugar with brown sugar for a richer flavor. If you’re looking for a lower-calorie option, consider using a sugar substitute like stevia or erythritol, depending on your preference.
Whole Milk: If you’re lactose intolerant, almond milk, oat milk, or coconut milk work well in this recipe. Just try to choose a version with a creamy consistency.
Oranges: This recipe really shines with fresh oranges. However, if fresh oranges aren’t available, orange juice can be used, but the zest for that fresh flavor is still important!
How Do You Get the Perfect Whipped Cream Frosting?
Whipping cream is a crucial part of the frosting. Here’s how to achieve that perfect fluffy texture:
- Start with chilled heavy cream. The colder, the better! This helps it whip up nicely.
- Use a bowl and beaters that are also cold for best results. I like to pop them in the fridge for 15 minutes before whipping.
- Whip on medium-high speed and slowly add powdered sugar while mixing, allowing it to blend in properly.
- Keep whipping until you see stiff peaks forming, but be careful not to over-whip, or it might become grainy.
What’s the Best Way to Make the Orange Glaze?
Making a smooth orange glaze is easy, but you’ll want to pay attention to a few details:
- If using marmalade, gently warm it in a saucepan over low heat until it’s easy to pour, but don’t boil it.
- For the juice glaze, mix cornstarch with water until smooth. Then, combine with orange juice and sugar in a saucepan. Heat over medium until it thickens, stirring constantly.
- Let it cool slightly before pouring over the cake so it doesn’t melt the frosting layer.
These tips should help make your Orange Creamsicle Cake a standout! Enjoy baking!
How to Make Orange Creamsicle Cake
Ingredients You’ll Need:
For the Cake:
- 2 ½ cups all-purpose flour
- 2 ½ tsp baking powder
- ½ tsp salt
- 1 cup unsalted butter, softened
- 1 ¾ cups granulated sugar
- 4 large eggs
- 1 tbsp vanilla extract
- 1 cup whole milk
- Zest of 2 medium oranges
For the Orange Whipped Cream Frosting:
- 3 cups heavy whipping cream, chilled
- 1 cup powdered sugar
- 1 tsp vanilla extract
- ½ cup fresh orange juice (strained)
- 1 tbsp orange zest
For the Orange Glaze:
- 1 cup orange marmalade or ½ cup fresh orange juice with ½ cup granulated sugar
- 1 tbsp cornstarch (if making glaze with juice and sugar)
- 2 tbsp water (if making glaze with juice and sugar)
For Decoration:
- Whipped cream (for piping)
- Orange segments (mandarin or navel oranges), peeled and separated
- Fresh mint leaves (optional)
- Crushed orange cake crumbs or zest for garnish
How Much Time Will You Need?
This delightful cake will take about 30 minutes to prepare, plus 25-30 minutes to bake, and then you’ll want at least 2 hours for chilling. So, set aside a total of around 3 hours for everything from baking to chilling.
Step-by-Step Instructions:
1. Preheating and Preparing Pans:
First things first, preheat your oven to 350°F (175°C). While that’s heating up, grease and flour two 8-inch round cake pans. This will help your cakes come out perfectly when they’re done baking!
2. Mixing the Dry Ingredients:
In a medium bowl, whisk together the all-purpose flour, baking powder, and salt. This mixture is very important as it helps your cake rise. Set it aside for a moment.
3. Creaming Butter and Sugar:
In a large mixing bowl, beat the softened butter and granulated sugar together until it’s light and fluffy—this should take about 3-5 minutes. Get ready for that heavenly smell!
4. Adding Eggs and Flavor:
Add the eggs one at a time, making sure to beat well after each addition. Mix in the vanilla extract and the orange zest for a burst of flavor!
5. Combining Wet and Dry Ingredients:
Now, it’s time to bring everything together. Alternately add the flour mixture and the milk to the butter mixture, starting and ending with the flour. Mix until just combined; be careful not to overmix!
6. Baking the Cake:
Divide the batter evenly between the prepared pans and smooth out the tops. Bake in your preheated oven for about 25-30 minutes. You’ll know they’re ready when a toothpick inserted into the center comes out clean.
7. Cooling Time:
Once baked, remove the cakes from the oven. Let them cool in the pans for about 10 minutes before turning them out onto wire racks to cool completely. Patience is key here!
8. Making the Whipped Cream Frosting:
While the cake cools, it’s time to whip up the delicious frosting! In a large bowl, beat the chilled heavy whipping cream with powdered sugar, vanilla extract, fresh orange juice, and orange zest until stiff peaks form. This will be dreamy!
9. Preparing the Orange Glaze:
For the orange glaze, if you’re using marmalade, heat it gently in a saucepan until it’s pourable. If making from juice, mix the cornstarch with water, and then combine it with the orange juice and sugar. Heat until thickened.
10. Assembling the Cake:
To assemble, place one cake layer on a serving plate. Spread a generous layer of the whipped cream frosting on top. Then, add the second layer on top.
11. Frosting the Cake:
Cover the entire cake with the remaining whipped cream frosting. Make it look nice and smooth—you got this!
12. Adding the Crushed Crumbs:
Take some crushed crumbs or zest and press it around the bottom of the cake for a pretty finish.
13. Glazing the Cake:
Now, pour the orange glaze over the top, allowing it to drip down the sides. It will create a deliciously shiny effect!
14. Decorative Touches:
Pipe whipped cream rosettes around the top edge of the cake. Decorate each rosette with orange segments and if you like, add a small mint leaf to finish off the look!
15. Chilling Before Serving:
Last but not least, refrigerate the cake for at least 2 hours before serving. This helps everything set nicely and makes it extra refreshing!
Enjoy your fresh, zesty Orange Creamsicle Cake! It’s perfect for gatherings, parties, or just a lovely treat at home.
Can I Use a Different Type of Milk?
Absolutely! If you prefer a dairy-free option, almond milk, oat milk, or coconut milk all work well. Just choose a variant that has a similar creaminess to whole milk for the best results.
How Can I Make This Cake Gluten-Free?
You can substitute the all-purpose flour with a gluten-free all-purpose flour blend that contains xanthan gum. Make sure to check the specific blend instructions for adjustments, as gluten-free flours can behave differently.
What’s the Best Way to Store Leftovers?
Store any leftover cake in an airtight container in the refrigerator for up to 3 days. If you want to keep it fresh for longer, you can freeze the cake slices wrapped tightly in plastic wrap and foil for up to 3 months. Just thaw in the fridge overnight before enjoying!
Can I Make the Cake in Advance?
Yes, you can bake the cake layers a day ahead. Let them cool completely, then wrap tightly and store at room temperature overnight. Frost the cake the next day, or refrigerate the unfrosted layers until you’re ready to serve!