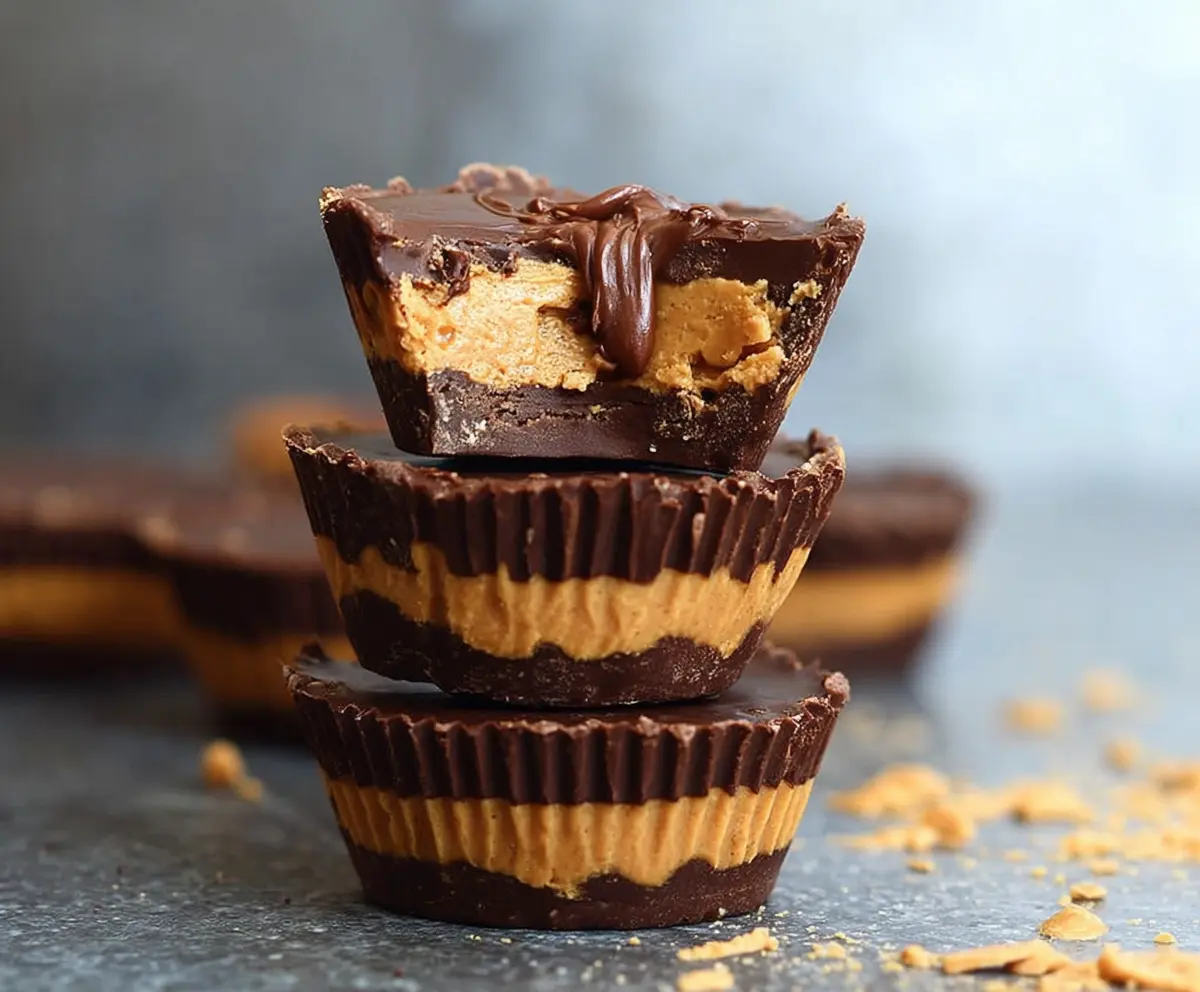
These Peanut Butter Protein Cups are rich, creamy, and oh-so-delicious! Made with smooth peanut butter and a hint of sweetness, they make an amazing treat.
Honestly, who can resist a snack that tastes like dessert but is packed with protein? I love having these handy for a quick pick-me-up during the day!
Key Ingredients & Substitutions
Peanut Butter: Natural creamy peanut butter is best for a smooth texture. If you’re allergic, almond or sunflower seed butter work well too. Just make sure to choose a variety that doesn’t have added sugars or oils for healthier options.
Protein Powder: Vanilla protein powder adds some sweetness to the cups. You can swap it with chocolate protein powder for a deeper flavor or opt for a plant-based version if you’re vegan. If you don’t need protein, simply use some additional powdered sugar.
Coconut Oil: This helps the chocolate set nicely. If you prefer, you can substitute with palm oil or even butter. However, coconut oil gives a nice tropical hint that complements the peanut butter flavor.
Dark Chocolate: I recommend using dark chocolate for richness, but milk chocolate or even dairy-free chocolate chips are good alternatives if you want something sweeter. Feel free to adjust the chocolate type to your taste!
How Do I Properly Melt Chocolate Without Burning It?
Getting the right consistency while melting chocolate is super important! Here are some easy and effective tips:
- Use a microwave-safe bowl and melt the chocolate in short bursts, about 20-30 seconds at a time. Stir in between until smooth.
- For stovetop, create a double boiler by placing a heatproof bowl over simmering water, stirring until melted.
- Be careful! Chocolate can quickly go from smooth to burnt, so keep an eye on it and stir to help it melt evenly.
Following these simple tips will ensure your chocolate melts perfectly, giving your Peanut Butter Protein Cups that deliciously creamy finish! Trust me, the first bite makes it all worth it.

How to Make Peanut Butter Protein Cups
Ingredients You’ll Need:
Base Ingredients:
- 1 cup natural creamy peanut butter (divided)
- 1/4 cup vanilla protein powder (whey or plant-based)
- 2 tablespoons honey or maple syrup
- 1/4 cup coconut oil, melted (divided)
- 1 cup dark chocolate chips or chopped dark chocolate
- A pinch of salt
- Optional: 1/2 teaspoon vanilla extract
How Much Time Will You Need?
This delicious recipe takes around 15 minutes of prep time with an additional 40 minutes for chilling in the freezer. In total, you’ll need about 55 minutes before you can enjoy these tasty Peanut Butter Protein Cups!
Step-by-Step Instructions:
1. Prepare the Peanut Butter Mixture:
In a mixing bowl, add 1/2 cup of peanut butter, protein powder, honey (or maple syrup), a pinch of salt, and half of the melted coconut oil. Mix everything together until it is smooth and well-combined. If you want a bit more flavor, feel free to stir in the optional vanilla extract!
2. Set Up the Cups:
Line a muffin tin with paper liners or lightly grease each cup with a little oil to make removal easier later on.
3. Melt the Chocolate:
In a microwave-safe bowl, melt the chocolate chips with the remaining coconut oil. Microwave in short bursts of 20-30 seconds, stirring after each, until you have a smooth chocolate mixture. If you’re using the double boiler method, place the bowl over simmering water and stir until melted.
4. Add the First Chocolate Layer:
Spoon about 1 tablespoon of the melted chocolate into the bottom of each cup, spreading it to cover the base evenly. Place the tray in the freezer for about 10 minutes to let this layer harden.
5. Add the Peanut Butter Layer:
Take the cups out of the freezer, and add about 1 to 1.5 tablespoons of the peanut butter mixture on top of the hardened chocolate layer. Press gently to flatten and create an even layer.
6. Finish with Chocolate:
Top off the peanut butter layer with another tablespoon of the melted chocolate, spreading it out to completely cover the peanut butter filling. This will seal it all in!
7. Freeze to Set:
Place the muffin pan back in the freezer for at least 30 minutes, or until all layers are firm. You want them to hold up nicely when you take them out!
8. Unmold and Store:
Once they are set, carefully remove the cups from the mold. Store them in an airtight container in the fridge or freezer to keep them fresh.
9. Enjoy Your Treat!
These Peanut Butter Protein Cups are best enjoyed chilled. They are the perfect snack to keep your energy up throughout the day while satisfying your sweet cravings. Enjoy!
Can I Use Crunchy Peanut Butter Instead of Creamy?
Absolutely! Crunchy peanut butter will add texture and a delightful crunch to your protein cups. Just make sure it’s natural with no added sugars or oils for the best flavor.
How Can I Store These Protein Cups?
Store your Peanut Butter Protein Cups in an airtight container in the fridge for up to a week or in the freezer for up to 2 months. Just allow them to thaw slightly at room temperature before enjoying if they’re frozen!
Can I Substitute the Protein Powder?
If you don’t have protein powder, you can simply omit it and add an extra tablespoon of peanut butter for consistency and flavor. Alternatively, you can use any flavored powder you like to complement the peanut butter.
What Can I Use Instead of Honey or Maple Syrup?
If you’re looking for a different sweetener, agave syrup, coconut nectar, or stevia can work well too! Just adjust quantities to taste, especially with stevia, as it’s much sweeter than honey or maple syrup.