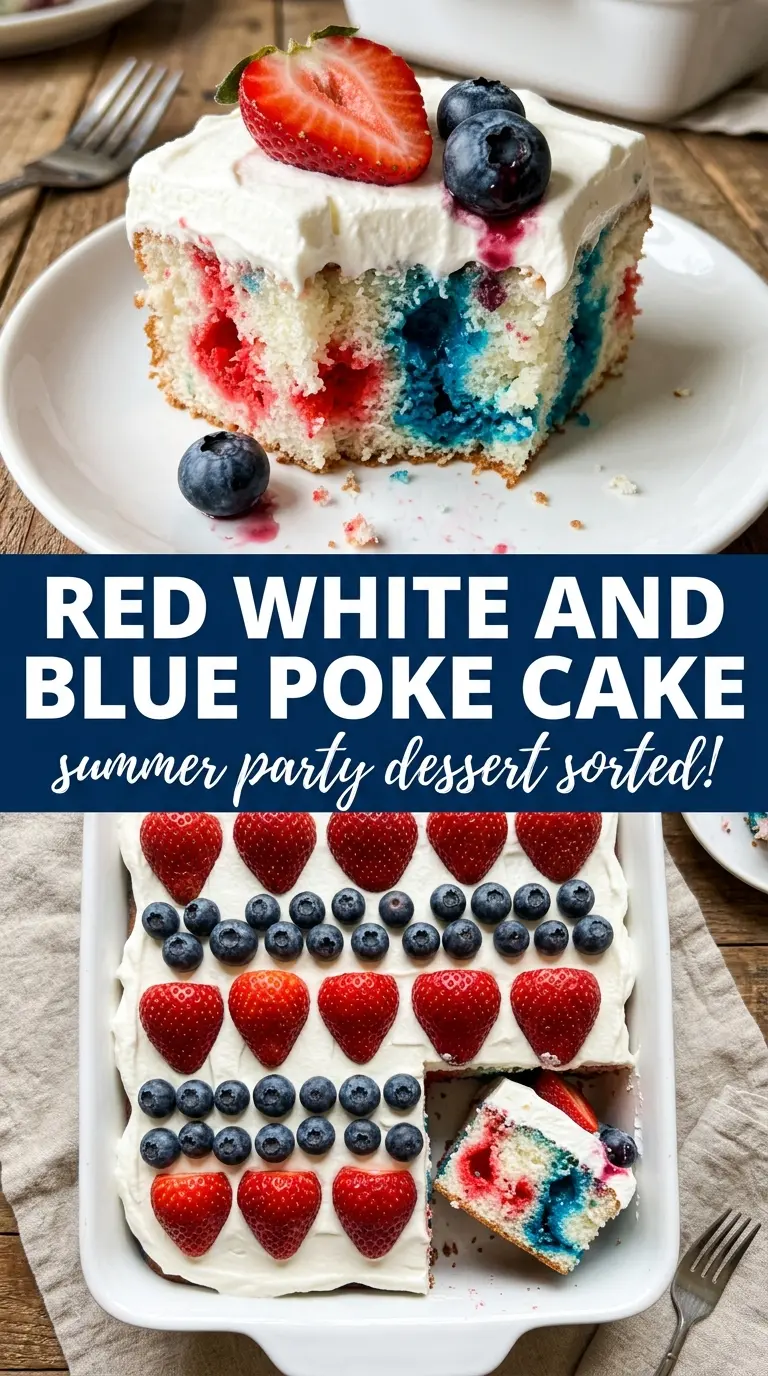
Red, white, and blue poke cake is the kind of dessert that disappears fast because every slice looks festive and tastes even better than it looks. The cake stays soft and cool, the Jell-O seeps all the way through the crumb, and the topping gives each bite that light creamy finish people expect from a chilled sheet cake. The stripes cut cleanly, which makes this one especially fun to serve when you want a dessert that gets a little gasp at the table.
The trick is timing. The cake needs to be warm enough to accept the gelatin, but not hot enough to turn the filling into a runny mess. Poking the holes evenly and pouring the red and blue Jell-O slowly over separate halves helps the colors stay bold instead of muddy. A simple white cake mix works well here because it gives you a blank canvas and a soft crumb that soaks up the Jell-O without falling apart.
Below, I’ve included the small details that matter most: how far apart to space the holes, how to keep the colors distinct, and the easiest way to frost and garnish the cake so it slices neatly.
The Jell-O soaked right into the cake without making it soggy, and the stripes stayed bright even after chilling overnight. I used the spoon handle like you said and every bite had that clean, cool texture.
Save this red, white, and blue poke cake for the next time you want a chilled sheet cake with bright Jell-O stripes and an easy whipped topping finish.
Why the Jell-O Needs a Warm Cake, Not a Hot One
The cake has to be warm enough for the gelatin to slide into the holes, but not so hot that it turns the whole pan gummy. Fifteen minutes out of the oven is the sweet spot for most boxed white cakes. At that point the crumb is still relaxed and open, so the Jell-O can soak down into the cake instead of pooling on top.
The other mistake is poking too few holes. Space them about an inch apart and go deep enough to reach most of the way through the cake without tearing it into chunks. That gives you the streaked look in the finished slices and keeps one section from tasting dry while another turns to jelly.
- White cake mix — A boxed mix gives you a soft, even crumb that takes on the Jell-O cleanly. A sturdier scratch cake can work, but anything dense or buttery won’t absorb the color the same way.
- Strawberry and berry blue Jell-O — These are what create the bright, separate stripes. Any red and blue gelatin will work, but strawberry keeps the red side sweet and familiar instead of tart.
- Whipped topping — Cool Whip holds its shape better than loose homemade whipped cream on a chilled sheet cake. If you do use homemade whipped cream, add it right before serving so it doesn’t slump.
- Fresh berries — The strawberries and blueberries are garnish, not just decoration. They echo the Jell-O flavors and give the top a fresh bite that keeps the dessert from feeling one-note.
What Each Ingredient Is Actually Doing in This Recipe
- Primary ingredient (the star) — Quality matters most. Choose the best you can find.
- Cooking medium (oil, butter, or broth) — This carries flavors and prevents dryness.
- Seasonings (salt, pepper, spices, herbs) — Layer flavors so nothing overpowers. Build depth gradually.
- Aromatics (garlic, onion, herbs) — Cook with fat to bloom flavors. Become the foundation.
- Supporting ingredients — Complement the main ingredient without overpowering it.
- Sauce or liquid (if applicable) — Brings flavors together. Balance richness with acid.
- Acid (lemon, vinegar, wine, or other) — Brightens and prevents flat-tasting results.
- Final finish (garnish, glaze, or sauce) — Prevents one-dimensional taste and adds visual appeal.
How to Keep the Colors Clean When You Soak the Cake
Cooling the Cake to the Right Point
Bake the cake in a 9×13 pan and let it sit for about 15 minutes before poking. If it is too hot, the Jell-O can run to the edges instead of settling into the holes. If it has gone completely cold, the gelatin won’t soak in as evenly and the stripes won’t reach through the crumb.
Poking the Holes Evenly
Use the handle of a wooden spoon and press down all over the cake in a tight grid. The holes should be close enough that every slice catches plenty of color, but not so close that the cake loses its structure. If you jab with a fork instead, the holes are usually too small and the gelatin sits near the surface.
Pouring the Gelatin One Side at a Time
Dissolve each flavor completely, then stir in the cold water before pouring. Work slowly over one half of the cake at a time so the red stays red and the blue stays blue. Pouring too fast is the easiest way to flood the top and blur the colors together before they have a chance to settle into the holes.
Chilling Before the Topping Goes On
Refrigerate the cake for at least 2 hours so the gelatin fully sets inside the crumb. If you frost it too early, the whipped topping can slide around and the cake can tear when you spread it. Once chilled, the surface firms up just enough to hold the topping and slice cleanly.
Dairy-Free Topping Swap
Use a dairy-free whipped topping in place of Cool Whip. The cake itself stays the same, and the final dessert still slices neatly, but the topping may soften a little faster once it sits out. Keep it chilled until serving for the best texture.
Fresh Berry Flavor Boost
Add extra sliced strawberries between the cake and the topping if you want a fresher, juicier bite. The fruit adds moisture and a little tartness, but it also shortens the fridge life a bit because the berries release juice as they sit.
Cupcake Version for Easier Serving
Bake the cake batter in a lined muffin tin, then poke and fill each cupcake with a little red or blue gelatin. This gives you neat individual servings, though the gelatin will set a little faster and the stripes won’t look as dramatic as they do in the pan.
Storage and Reheating
- Refrigerator: Store covered for up to 4 days. The cake stays moist, though the topping softens a little after the first day.
- Freezer: I don’t recommend freezing this cake. The gelatin and whipped topping change texture after thawing and the cake turns watery.
- Reheating: Don’t reheat it. Serve it cold straight from the fridge for the cleanest slices and the best Jell-O texture.
Questions I Get Asked About This Recipe

Red, White and Blue Poke Cake
Ingredients
Equipment
Method
- Bake the white cake in a 9x13 pan according to package directions. Let the cake cool for 15 minutes until it’s warm rather than hot.
- Using the handle of a wooden spoon, poke holes all over the cake about 1 inch apart. Keep going until the surface looks evenly dotted.
- Dissolve strawberry Jell-O in 1 cup boiling water, then stir in 1/2 cup cold water. Pour slowly over the left half of the cake so it soaks into the holes.
- Dissolve berry blue Jell-O in 1 cup boiling water, then stir in 1/2 cup cold water. Pour over the right half of the cake so the color fills the holes on that side.
- Refrigerate the cake for at least 2 hours until the Jell-O is fully set inside the cake. You should be able to slice cleanly without loose liquid running.
- Spread the whipped topping evenly over the top of the chilled cake. Cover the surface completely for a smooth white layer.
- Decorate with red and blue star sprinkles and fresh strawberries and blueberries before serving. Finish right before slicing so the topping looks fresh.